Waveguides? Aren't they a bit complicated?
In a word, Yes! Microwave technology is pretty esoteric, and it used to be reserved for the "spooks" designing electronic warfare systems, radars, and the like.
But microwave equipment has been steadily penetrating into mainstream applications. Microwave ovens (operating at 2.4GHz) have already been with us for several decades. These have been joined by satellite dishes and LNBs operating at 10GHz and more recently, multichannel 2.4GHz cordless phones.
Microwave technology seems complex because we have left the boffins in charge for too long. Microwave text books have been written by academics who revel in every detailed equation. But you don't really need to know about Poynting vectors or Maxwell's equations to deploy a really effective Wireless LAN. Let me show you how simple it really is...
What is the 2.4GHz ISM Band?
Wireless networking systems using the 802.11b standard operate in the 2.4GHz ISM band. Other services, including microwave ovens, medical equipment, and cordless phones also operate in the ISM band. The IEEE 802.11b standard defines how WLAN networking will be configured, and how interference can be minimized from the other services operating at the same frequencies.
| Channel ID | US/Canada | Europe | France | Spain | Japan |
| 1 | 2412 | 2412 | - | - | 2412 |
| 2 | 2417 | 2417 | - | - | 2417 |
| 3 | 2422 | 2422 | - | - | 2422 |
| 4 | 2427 | 2427 | - | - | 2427 |
| 5 | 2432 | 2432 | - | - | 2432 |
| 6 | 2437 | 2437 | - | - | 2437 |
| 7 | 2442 | 2442 | - | - | 2442 |
| 8 | 2447 | 2447 | - | - | 2447 |
| 9 | 2452 | 2452 | - | - | 2452 |
| 10 | 2457 | 2457 | 2457 | 2457 | 2457 |
| 11 | 2462 | 2462 | 2462 | 2462 | 2462 |
| 12 | - | 2467 | 2467 | - | 2467 |
| 13 | - | 2472 | 2472 | - | 2472 |
| 14 | - | - | - | - | 2484 |
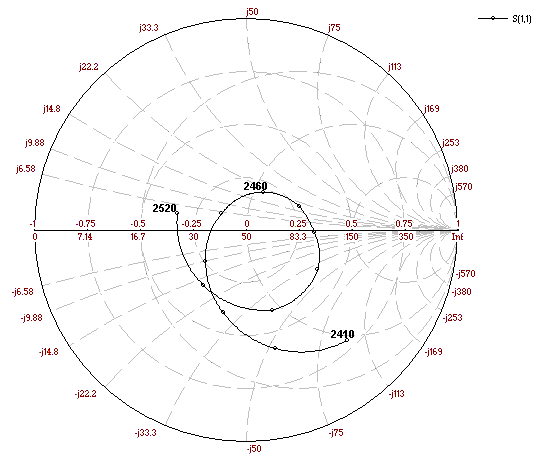
A WLAN receiver can use any of these channels, and can automatically hop from channel to channel if interference is encountered. An 802.11b antenna for the US and Canada should radiate well between 2410 and 2460 MHz.
| Slotted Waveguide Antennas Unlike wideband antennas like the biquad, slotted waveguides are resonant antennas, and have a relatively narrow operating frequency range. The designs I am describing on this page have an adequate bandwidth for any WLAN, but they have been carefully designed and must be equally carefully constructed. The major attraction of a slotted waveguide design is its simplicity. Once you have built the first one it is very simple to build many more. The gain varies little across the 802.11b spectrum, dropping a little bit at the extreme ends. |
How I Produced These Designs and Charts
These slotted waveguide designs are the result of lengthy simulation using Zeland Software's Fidelity and IE3D electromagnetic simulators. Fidelity is much better at modelling waveguide structures than my favorite simulator, NEC2, but it is quite an expensive package, with a long learning curve...
Simulation can give you much more information about the performance of a microwave antenna than you get from building it. This is because there are severe limitations in the accuracy of measurements at microwave frequencies. Simulation makes it easier to see subtle interdependencies that would be very difficult to measure. In this case, I used the simulation to tell me how the antennas should behave, and then verified the performance both in my lab and on my antenna 'test range'. The results were surprisingly accurate - and attest to the quality of the Zeland Fidelity software.
 | How a Waveguide Antenna Works A waveguide is a very low loss transmission line. It allows us to propagate signals to a number of smaller antennas (slots). The signal is coupled into the waveguide with a simple coaxial probe, and as it travels along the guide it traverses the slots. Each of these slots allows a little of the energy to radiate. The slots are in a linear array pattern, and the total of all the radiated signals adds up to a very significant power gain over a small range of angles close to the horizon. In other words, the waveguide antenna transmits almost all of its energy at the horizon, usually exactly where we want it to go. Its exceptional directivity in the elevation plane gives it quite high power gain. Additionally, unlike vertical colinear antennas, the slotted waveguide transmits its energy using HORIZONTAL polarization, the best type for distance transmission. At left we can see a graphical representation of the E field intensity shortly after starting excitation of an 8 slot waveguide. The slots are to the left of the image. The coaxial probe is at the lower end of the image, and the field can be seen to be clumped at maxima every half wavelength as they travel up the waveguide. The waveguide airspace takes up the middle 1/2 of the bluespace, the rest is air infront of (to the left) and behind (to the right) the antenna. If you click here you can bring up a Windows Media Format Movie version. An MPEG-1 version is at this link. You can see the wave travelling up the waveguide from the probe. The intensity of the E field is given by the color. Here we have primarily blue colors, about -40dB on the final (red) intensity which is achieved once the resonance is fully excited. When the signal first gets to the top and starts reflecting back down the air column it is still green, about -30dB from its ultimate intensity. Reflections are also occuring from the plug at the bottom of the airspace, and the sum effect of all these, including continual drive from the coaxial probe, allows the intensity to build up through yellow and red (0db) signal levels. You can see the signal radiating out the slots at the left of the image. The radiation intensity is less at the top than at the bottom in an 8 slot design, it is hard to radiate perfectly with such a limited number of slots. |
Unidirectional Waveguide Antennas I am going to describe two unidirectional designs. The first has 8 slots and is about 30 inches long. The second has 16 slots and is about 5 feet long. Simple to construct, the 8-slot has been provided as a good starting point for an antenna novice. I built my 8 slot prototype using only hand tools.
| |||||||
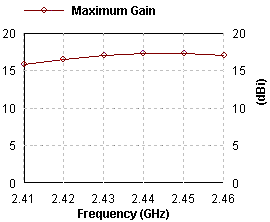
Performance 16 slot Unidirectional | ||
 | ||
 High
High 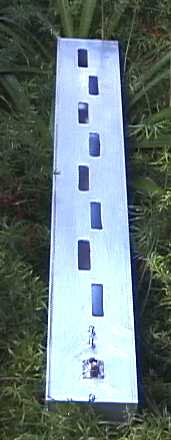
The 16 slot design has been made to radiate over a wider beamwidth by the addition of "wings" to each side of the guide, flush with the front (slotted) surface. It is, of necessity, higher Q, and the higher gain is obtained over a narrower bandwidth. They can be expanded aluminium or sheet, and should extend 9.6 inches beyond the sides of the guide. They act as a ground plane for the slots. Do not change this dimension, it is two electrical wavelengths.
Omnidirectional Slotted Waveguide Antennas
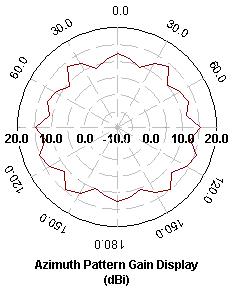
The slotted waveguide has achieved most of its success when used in an omnidirectional role. It is the simplest way to get a real 15dBi gain over 360 degrees of beamwidth.
Horizontal Polarization in a wide area network can often double the number of users that can interconnect without interference. When using horizontally polarized BiQuads, or Patch antennas (provided that they have been tested for good cross-polarization performance) at the client site, these omnis will be 20 dB stronger than the signal from a similar vertical collinear. Conversely, vertically polarized receiver antennas will prefer the vertically polarized colinear over the slotted waveguide by a similar amount. Transmission on an immediately adjacent channel, (say, channels 5 or 7), normally not permissible because of interference, is now possible. So a judicious intermingling of horizontally polarized clients can talk with a horizontal central station on the same or adjacent channels that other clients are using with vertical polarization.To make the unidrectional antenna radiate over the entire 360 degrees of azimuth, a second set of slots are cut in the back face of the waveguide. When looking stright at the face of the waveguide you will be able to see straight through both slots.
Unfortunately, unless a lot of slots are used, the antenna becomes more like a bidirectional radiator, rather than an omnidirectional. This antenna was invented in the 40's, and as our simulation and measurement technologies have become more accurate it is apparent that the slotted waveguide designs we have used in the past are far from optimum. The most common defect is a 'tilt' in the radiation pattern at the extreme ends of the frequency range. This occurs when the wavelength of the signal travelling down the guide differs from the slot spacing.
My current favorite uses 32 slots to get 15dBi of gain, radiated in a uniformly omnidirectional manner. The large number of slots makes it easier to dissipate the energy from the waveguide. Like with the 16 slot unidirectional, two sets of "wings (one set at each slot surface) are required to get equal radiation of energy over a full 360 degrees. Note that a higher Q is necessary to get all the slots illuminated evenly.
 |
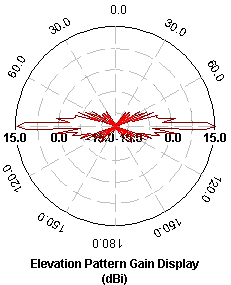
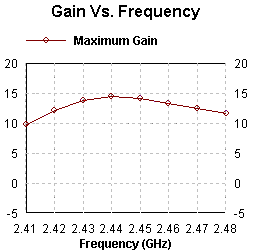
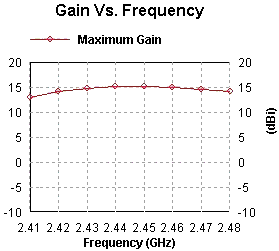
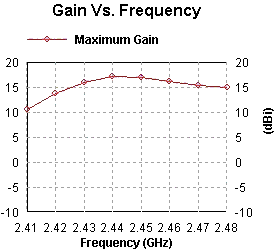
Note that the gain vs frequency curve is peaked at 2440, and it radiates well over all 14 channels.
Highly Directional Slotted Waveguide Antennas Sometimes it is useful to have a highly directional antenna. For example, when installing a point-to-point link between two buildings it is not desirable to have a wide angle of coverage. Any interference from other 802.11b devices (or microwave ovens) that are in the radiation zone will affect your link integrity. The ideal antenna for such a situation is a dish, such such as the Primestar dish. When using my Biquad feed, it is possible to reject interference outside the dish's primary 5 degree cone by 30 dB or more.
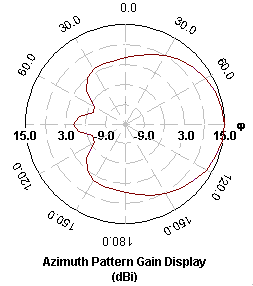
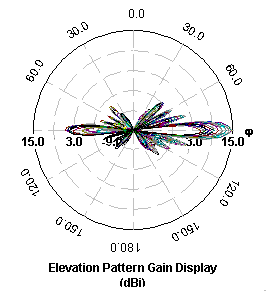
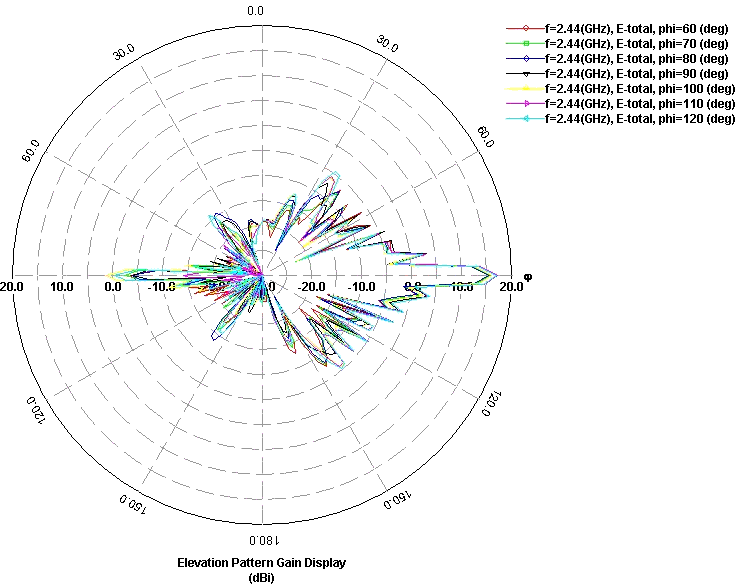
But, if a 16 slot waveguide antenna is turned to a horizontal position, parallel with the ground, it will radiate vertical polarization. Its directivity in this plane is extremely good. As you can see from the diagram to the left, most of the spurious lobes are more than 20 dB down from the main signal, and they are very narrow (click to enlarge the image). This performance is comparable with my commercial HP2419G Parabolic Grid Antenna... So, if you don't have a dish handy, consider the possibility of using a pair of these slotted waveguides, parallel to the ground. They will work well. Very well... |

Constructional Details for the 8 Slot Unidirectional Antenna
The base extrusion for all my slotted waveguides is 4 inch by 2 inch O.D. rectangular aluminum tubing with approx 1/8 inch thick walls. Inside dimensions are 3.756x1.756 inches (95.4mm x 44.6mm). These inside dimensions are critical, and must be within +- 0.040 inches or +-1mm if the antenna center frequency is to be +- 1 channel. I cut the end inserts from a 5/16 inch by 1 3/4 inch flat aluminum bar extrusion. There - those are the last dimensions I will give in inches, as millimetres are a much more accurate way to describe the dimensions for a microwave antenna. Waveguide antennas are fairly critical in their constructional dimensions, and are easiest to make with a CNC milling machine. I have computed these designs so that they would be easy to replicate, and if you are plus or minus 1 mm the design will work fine - but you must be careful. I used a jig, a hand operated DeWalt heavy duty cut-out tool, a 1/4 inch router bit, and lots of water to 'machine' my slots, and it worked fine (even if it was a little tedious).
"Please machine this slot to 59.417mm in length"
In the days before computing power was free, engineers spent their whole careers deriving formulae to try and describe the operation and design of Slotted Waveguides. You can find designs specified to 1 or 2 decimal places of a millimeter, but I have rounded everything off to the nearest millimeter. Since it was relatively easy for me to "build" structure after structure in the electromagnetic simulator, an understanding of the inter-dependance of each parameter came quite quickly. That understanding takes away the 'black magic' that used to be associated with design of these antenna systems.
Really folks - plus or minus 1 mm will not kill your antenna!
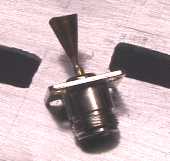
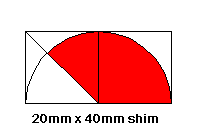
| Coupling the Signal Into the Waveguide As I said above, we are propagating the WLAN signal down a waveguide and then using it to excite a number of elemental radiators, or slots. The first task is to get the signal into the waveguide with a feed probe. Obtain a suitable N connector, for example, the one from Amphenol in Figure 2 of this catalog page. Take a piece of 20mmx40mm copper or brass shim, cut the red portion and form it into the shape of a cone. Solder it to the inner conductor of your Type N connector (see photo). Its length should be 20mm, its largest diameter about 15mm. When soldered to the N connector it should protrude exactly into the center of the waveguide and no further.
Both ends of the waveguide need to be terminated for RF, and the easiest way I found to do this was to cut 3.75 inch pieces (darn - there are those inches again - I will be excommunicated from the microwave community at this rate...) of 5/16 by 1.75 aluminum bar stock. I do not recommend that you make the end plugs sloppily, but good electrical contact is not required. Remember not to have any screws protruding into the waveguide for more than 1/8 inch, especially the screws holding down the N connector. They will affect performance. The total length of air inside the 8+8 slot omnidirectional waveguide, from end to end, is 765mm. Mount the N connector in the center of the widest side, 27.5mm from one end (the 'base') of the airspace in the waveguide and offset 10 mm from the centre line of the face, in the direction as the offset of the first slot.. The wavelength of the radiation passing down the waveguide is longer than a wavelength in free air (it is 161mm in this design). | |
The first slot is centered 1.0 wavelength from the base, at a maximum of the H field in the waveguide. This length is 161mm from the base of the airspace. It is the H component of the field that induces the energy into the slots, and makes them radiate. Each slot is 59mm long, and extends outwards from the centerline for a width of 17mm. The waveguide excites each edge of the slot depending on its position across the wide surface of the guide. If it straddled the exact centre, each edge of the slot would be excited in anti-phase, and there would be no radiation. So we offset the edges of the slots, the more the offset the greater is the energy that is dissipated into each slot. The electrical length of each slot should be 59mm. Do not allow too much kerf at the ends (2 mm radius max). I recommend finishing the cut with a 1/8 inch router bit (or a file). Or you might use the 1/8 bit in a CNC machine to cut the entire rectangular outline. Remember, even though these slots are arranged vertically they radiate horizontal polarization.
For the 8+8 omnidirectional, slots 2 thru 8 are centered at distances of 241, 322, 403, 483, 564, 644 and 724mm from the base of the airspace, staggerred across the centerline. It doesn't matter which direction the first one is cut, but they must alternate. The end plate should create a 765 mm airspace. Looking straight on at the front of the guide you can see right through both the front and back slots.
For the 8 slot Unidirectional:The total length of air inside the 8 slot unidirectional, from end to end, is 760mm. Mount the N connector in the center of the widest side, 25mm from the base of the airspace in the waveguide. The wavelength of the radiation passing down the waveguide is 160mm in this design. The first slot is centered 1.0 wavelength from the base, at a maximum of the H field in the waveguide. This length is 160mm from the base of the airspace. Each slot is 58mm long, and extends outwards from the centerline for a width of 20mm. The waveguide excites each edge of the slot depending on its position across the wide surface of the guide. If it straddled the exact centre, each edge of the slot would be excited in anti-phase, and there would be no radiation. So we offset the edges of the slots, the more the offset the greater is the energy that is dissipated into each slot. The electrical length of each slot should be 59mm. Do not allow too much kerf at the ends. Remember, even though these slots are arranged vertically they radiate horizontal polarization.
Slots 2 thru 8 are centered at distances of 240, 320, 400, 480, 560, 640 and 720mm from the base of the airspace, staggerred across the centerline. It doesn't matter which direction the first one is cut, but they must alternate. The end plate should be to create a 760mm airspace.
 | Constructional Details for 16 and 16+16 Slot Design The correct wavelength for these designs is 161mm. The gain for the 16 slot Unidirectional is 15dBi-17dBi, verified on my test range, across the whole band. On the range the 16 slotter gives slightly higher gain than my Hyperlink Technologies model 2419G Mesh Parabolic, which is "rated" at 19.1dBi gain. The slot width for the 16 slotter is 15mm, for the 32 slotter is 12mm, otherwise the key dimensions are the same.Both PDF and DXF versions of the drawings are available for download. Designs for different size tubing: The optimum design for a 16 slot unidirectional with Indian standard 95.24mm x 38.39mm x 3.18mm tubing gives a wavelength of 163mm. This means that the slots are centered at 163mm / 2 = 81.5mm intervals, rather than the 161mm basis which was used in the Autocad drawings. The N connector for the feed is spaced only 25mm from the base of the airspace, and offset 10mm to the left of the centerline of the guide's face. The length of the aircolumn will be 163 x 8.75 = 1426mm. The slot width for the 16 slotter stays the same at 15mm, and the slot length should be 58mm. For the 16+16 slot omni version use a slot width of 12mm. The feed cone must not protrude more than halfway into the waveguide. With this tubing, the feed cone should not protrude more than 19mm into the tubing. Just use the same drawing as I have shown above, but make it from 17mm X 34mm shim rather than 20x40. 100mm x 50mm x 3mm Metric size tubing: use the same 161mm wavelength and dimensions as for the US designs, but offset the feed point 15mm from center line instead of 10mm to bring the resultant SWR closer to unity.
|
Weather and your Antenna
Use nylon, aluminum or stainless steel screws and fasteners, as suits your preference, not normal (corrosive) ones. Unless you use some low RF loss tape (like mylar or kapton) to cover the slots, bugs will make their homes in the structure and spin their webs across the slots. There are two approaches to this. Either you dont bother about it, and just hose the antenna clean every year or so, or you use, and regularly replace, the protective tape. One tip - there is relatively little RF energy reaching the end away from the base, and if you mount the antenna upside down you can actually cut holes in the end cap so as to let out water and bugs that might otherwise accumulate there. I have simulated that 4 one half inch diameter holes in each vertex of the far end plug do not affect performance in any measurable way. I also simulated the use of a 2.75 by 1.75 inch plug at the far end (with 1/2 inch gaps for cleaning) and found no noticeable degradation. I don't recommend that you encourage bugs to accumulate near the feed probe, however...
So happy WLANing, and please don't forget to email me with your experiences.


do you have any idea how to calculate and graphing a radiation pattern, beamwidth, and gain without any simulator... ??? if you have email me?? gen5x4@gmail.com
ReplyDeleteSlotted Angle manufacturers Delhi- We are leading Slotted angle racks manufacturer and supplier, commercial steel /iron Slotted angle racks, office steel /iron Slotted angle racks Delhi (India).
ReplyDeleteOh my goodness! Incredible article dude! Thank you, However I
ReplyDeleteam experiencing problems with your RSS. I don’t understand the reason why I am
unable to subscribe to it. Is there anybody else having
the same RSS issues? Anyone that knows the answer can you kindly respond?
Thanks!! yellow pages
Here is my webpage ; payday loans
This blog was... how do you say it? Relevant!! Finally I have
ReplyDeletefound something that helped me. Cheers! ppi claims commission
Also see my website - ppi claims
Everything is very open with a very clear description of the
ReplyDeleteissues. It was definitely informative. Your website is useful.
Thanks for sharing! http://www.getforexautomoney.net/
My webpage: million dollar pips
Howdy! I simply wish to give you a big thumbs up for the excellent information you have got
ReplyDeleteright here on this post. I am coming back to your web site for
more soon. injury claim
my website :: Read This
I could not resist commenting. Perfectly written!
ReplyDeletelive tv online
Also visit my webpage - http://www.watchtvonline.me.uk/
After looking into a few of the blog articles on your web page,
ReplyDeleteI seriously like your technique of blogging. I saved as a favorite it to my bookmark webpage list and will be checking back in the
near future. Take a look at my web site as well and tell
me your opinion. loans for people with bad credit
my website - http://www.mybadcreditloans.org.uk/